Protocol: One Finger Braking (Index-Finger Braking)
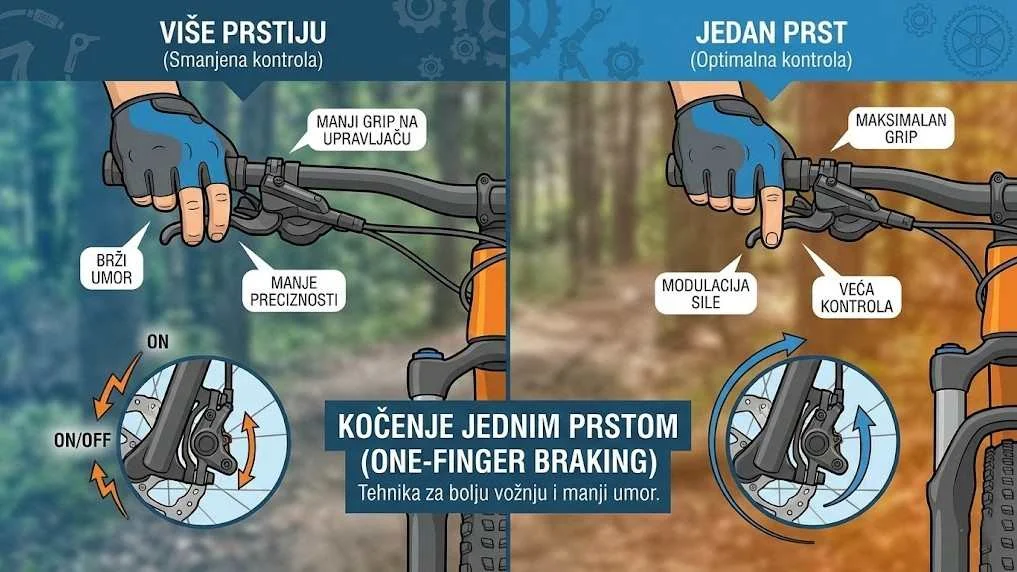
Goal: Maximize handlebar control and fine-tune your braking force through proper one finger braking.
One finger braking lets the other three fingers (and your thumb) hold the handlebar firmly (the grip). This is key to staying safe on rough terrain. Modern hydraulic brakes have enough power to stop a bike with the index finger alone, which makes this MTB braking technique the standard in the mountain biking world.
Glossary of Key Terms
1. Biomechanics: Why Is One Finger Braking Safer?
The math of your grip is simple, and the difference in safety is huge. One finger braking isn't about style, it's about physics.
Zero fingers hold the bar (only the thumb). If you hit a hole, your hand flies off the handlebar. Loss of control is instant. This is the most common cause of crashes for beginners.
Three fingers plus the thumb hold the bar firmly. This is the "round grip" that locks your hand around the grip, letting you survive hard hits from the terrain without losing control.
2. Hardware Setup: Adjusting Your Cockpit
The biggest reason beginners use two fingers is a poorly set up bike. Levers are often too close to the grips, which makes one finger braking impossible to do efficiently. A proper brake lever setup fixes that. Move them out!
| Adjustment | What to do | Test |
|---|---|---|
| Position (left-right) | Slide the lever toward the middle of the handlebar (inward) by 2-3 cm. | When you place your index finger on the "hook", your other fingers must not touch the lever. |
| Reach | Use the screw to adjust the distance between the lever and the handlebar. | The lever should sit close to the first knuckle of your index finger, but not touch the grip when pulled. |
| Angle | Rotate the levers downward. | The levers should follow the line of your forearms (approx. 45 degrees) while you sit or stand on the bike. |
3. Drill: Reprogramming Your Brain
If you've been braking with two fingers for years, switching to one finger braking will feel strange for the first 30 minutes. Practice in a parking lot.
- Hold the handlebar with 2 fingers on the brake lever. Have a friend try to rip the bar out of your hands.
- Now grab the bar with the one-finger grip (3 fingers on the grip). Repeat the test. The difference in stability is huge.
While riding, consciously look at your hands. Repeat the mantra: "One finger, one finger". Stick a piece of tape on the handlebar as a reminder that this grip is the priority.
4. Exceptions to the Rule (When to Use 2 Fingers?)
Old V-brakes or cheap mechanical discs on kids' bikes often lack the power. In that case, braking with a single finger may not be possible.
If a child physically doesn't have the strength in one finger, allow 2 fingers until they grow or until you get better brakes.
5. The Safety Angle: Why Is This the Standard?
Many beginners think more fingers on the brake means more braking force. That's a myth. One finger braking actually lets you grip the handlebar harder, which is crucial when you hit roots or rocks.
Modern brakes are ergonomically designed for exactly one finger. Using two fingers pushes your hand into an unnatural position, reduces control and brings on arm pump faster. Once you switch to this technique, you instantly become a safer and faster rider, because you have better control of the bike in critical situations.
Pro Tip: The Golden "Hook" Rule
Always brake with the very end of the lever (where the curved "hook" is). The farther you are from the axis of rotation (the brake's pivot point), the greater the leverage. If you brake in the middle of the lever, you need 2x more force for the same effect. Set up your brake so your index finger catches ONLY the end of the lever for optimal one finger braking.