Tech Tips · Brakes
How to Bleed Shimano Brakes
A Step-by-Step Guide
How do you bleed Shimano brakes at home? A spongy brake lever that sinks to the grip is usually fixed by bleeding, and with this guide you can finish the job in about 30 minutes. If you're not sure, we bleed Shimano brakes at the Evolution Bike Workshop in East Sarajevo.
By Marko Ristivojević, Master Bike Mechanic
In Short
Shimano brake bleeding is the process of using mineral oil to push air out of the hydraulic system: the oil is pushed from the caliper toward the lever, and the last bubbles are removed by "burping." Use mineral oil only, never DOT.
Time
About 30 minutes with the "One-Way Bleeding" system
Oil
Shimano mineral oil only, never DOT
Difficulty
One of the easiest jobs on Shimano brakes
Take it to the shop
If the lever still sinks
Author: Marko Ristivojević, Master Bike Mechanic · BK MTB Evolution, East Sarajevo
How to Bleed Shimano Brakes at Home
Wondering how to bleed Shimano brakes at home? There's no worse feeling on the trail than a "spongy" brake lever: you squeeze, and it sinks to the grip, or the bite point keeps wandering.
If you ride Shimano (Deore, SLX, XT or XTR), this is one of the easiest jobs to do yourself. With the "One-Way Bleeding" system, you'll learn how to bleed Shimano brakes in about 30 minutes.
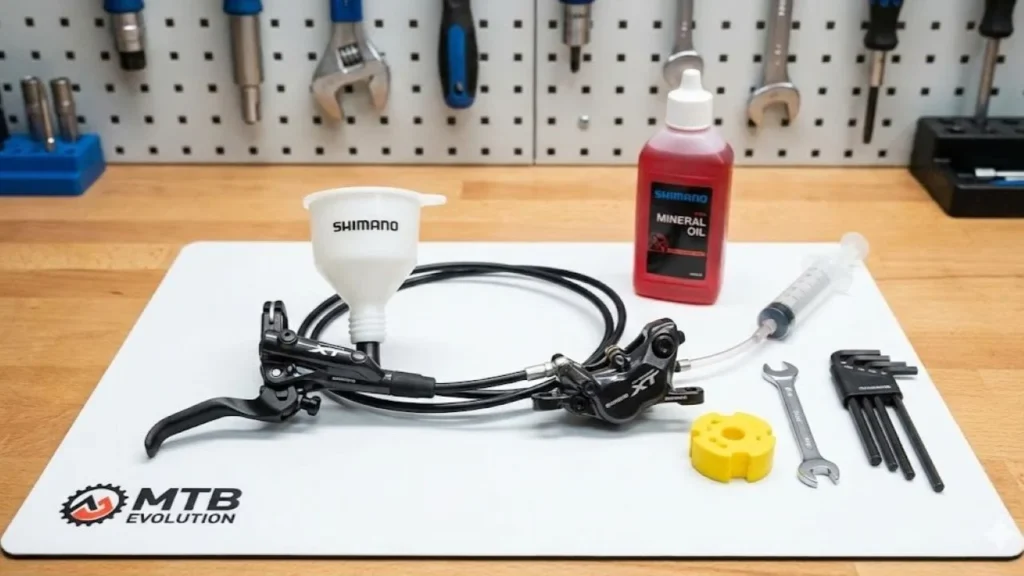
How to Bleed Shimano Brakes: Tools You Need
Shimano funnel – the yellow cup for the lever
Syringe and hose – for pushing oil from the caliper
Mineral oil – Shimano (red), never DOT oil
Bleed Block – the yellow plastic spacer that keeps the pistons apart
Wrenches – 2.5 mm, 4 mm and 5 mm hex keys, plus a 7 mm open-end wrench for opening the bleed nipple on the caliper
Isopropyl alcohol – for cleaning up the mess
Warning: Shimano uses mineral oil only. If you accidentally pour in DOT oil (which goes into SRAM/Avid), it will eat away every seal and permanently ruin the brake. Check the bottle twice! For more on hydraulic brakes, visit the official Shimano website.
Step 1: Preparation and Safety
The first rule of hydraulics: oil and brake pads don't mix. If a drop of oil lands on the pads, you can throw them away.
Remove the wheel, take out the retaining pin and the pads from the brake caliper, and set them far away in a safe place.
Push the pistons all the way in with a plastic tire lever, never a metal screwdriver, so you don't damage the ceramic pistons. Insert the yellow Bleed Block into the caliper and secure it.
Step 2: Setting Up Your Workstation
Put the bike in a stand. Loosen the brake lever on the handlebar and rotate it so it sits parallel to the floor, so the air can escape at the top.
Unscrew the bleed screw on the lever (be careful not to lose the O-ring) and thread in the yellow Shimano funnel. Pour in a little mineral oil, just enough to cover the bottom, and remove the plug.
Pro tip: If you're working on the rear brake, set the bike up so the front end is slightly higher. Air always travels up, so make its path to the funnel easier.
Step 3: Pushing the Oil From the Bottom Up
Fill the syringe with mineral oil (make sure there are no bubbles in the syringe). Remove the rubber cap from the bleed nipple on the caliper and attach the syringe hose.
Use a 7 mm wrench to open the nipple gently, just a quarter turn, then slowly push oil in from the syringe.
Watch the funnel on the handlebar: bubbles and dirty (gray) oil will come out. Keep pushing until clean, red, bubble-free oil comes through. Then close the nipple (7 mm) and only after that remove the hose.
Step 4: Burping, Removing the Last Bubbles
The caliper is closed, but there may still be some air hiding in the lever. The funnel stays on the lever, full of oil – squeeze the lever a few times (pump it).
Hold the lever squeezed, then release it suddenly. Tap the hoses with your fingers from the bottom to the top to chase the bubbles out.
Repeat until the lever feels rock hard. When there are no more bubbles, put the plug in the funnel and unscrew it.
Step 5: Closing Up and Cleaning
Put the small screw with its O-ring back on the brake lever and don't overtighten it; the plastic threads are delicate.
Spray the lever and caliper with isopropyl alcohol and wipe them with a clean cloth.
Only when everything is dry and clean, remove the Bleed Block, refit the pads and the wheel. Before hitting the trail, test the brake in front of your house: the bite point should be clear, firm and consistent. If the brakes still squeal, check out our guide to squeaky brakes, and if your pads are worn, choose the right pads.
FAQ: Bleeding Shimano Brakes
Which oil goes in Shimano brakes?
Shimano brakes use only mineral oil (red). DOT oil, which goes in SRAM/Avid brakes, eats away the seals and permanently ruins the brake.
How long does it take to bleed Shimano brakes?
With the "One-Way Bleeding" system and this guide, bleeding takes about 30 minutes.
What is the Bleed Block for?
The Bleed Block is a yellow plastic spacer that keeps the pistons apart. You insert it into the caliper after removing the pads and pushing the pistons in.
How do I know the bleed is done?
No more bubbles come out into the funnel, and the lever feels firm. The bite point should be clear, firm and consistent.
When should I take my brakes to a shop?
If the lever still sinks or you're not sure you got all the air out, come to the Evolution workshop. We use vacuum pumps for a perfect bleed.