Protocol: The MTB Manual – King of MTB Skills
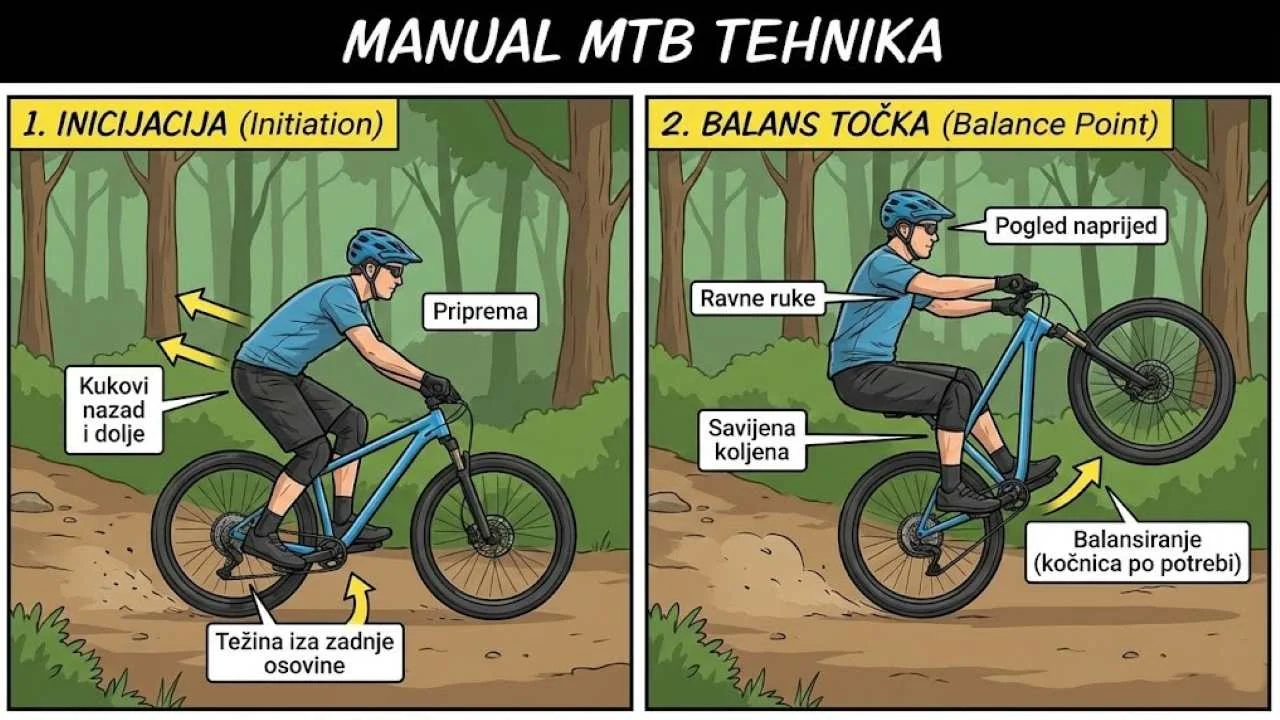
Goal: Nail the MTB manual by keeping the front wheel in the air without pedaling, so you can roll over a series of obstacles (rollers, roots) without losing speed.
This technique uses your body as a counterweight. You are the weight on one side of a seesaw (behind the rear axle), and the front wheel is the other side. The lower and further back you are, the easier the wheel goes up.
Safety Protocol (Read This First!)
Before you try to lift the front wheel, you need to know how to save yourself from falling on your back (Looping Out).
- Finger on the trigger: The index finger of your right hand (rear brake) must ALWAYS be on the lever.
- Reflex: If you feel yourself falling backward, squeeze the rear brake. The wheel will drop faster than gravity.
Glossary of Key Terms
1. Biomechanics: Initiation (The L-Move)
Most people simply pull the handlebar with their arms. That is a mistake. A good manual comes entirely from your legs and hips.
| Phase | Action | Body focus |
|---|---|---|
| 1. Approach | Medium speed, standing position. | Body neutral, knees slightly bent. |
| 2. Pre-load | Compression. | Quickly drop your chest toward the handlebar (load the fork with energy). |
| 3. Pull (L) | L-Move | Explosively drive your hips DOWN and then BACK. Your arms straighten like chains. |
| 4. Legs | Pushing | The moment your hips go back, push the bike out in front of you with your legs. |
Level 2: "Short Manual"
The goal is to keep the wheel in the air for 1 to 2 seconds (the length of a puddle or a root).
Don't look for perfect balance. Just lift the wheel, hold it up with straight arms and heels down, and let it drop after the obstacle.
Level 3: "Sweet Spot & Pump"
Entering the Balance Point (Sweet Spot), which is much further back than you think.
This position is not static. Your legs must work as shock absorbers (soaking up bumps) and pistons (pumping the dips for speed) while the front wheel is up.
2. Training Plan: Skill Progression for Your MTB Manual
| Drill | Level | Goal |
|---|---|---|
| The Safety Brake | Level 1 | On flat ground, lift the wheel and DELIBERATELY bring it down with the rear brake. Gets rid of the fear. |
| "Loop Out" Drill | Level 2 | On grass, deliberately overshoot and "fold" backward. Learn to land on your feet. |
| Parking Lines | Level 2 | Try to hold the manual between two lines in a parking lot (3-5 m) with straight arms. |
| Roller Coaster | Level 3 | Ride it on a pump track over two waves. Generate speed through pumping. |
Most Common Mistakes (Troubleshooting)
| Mistake | What it looks like | Fix |
|---|---|---|
| Bent elbows | You pull the handlebar into your chest and the wheel drops right away. | Straighten your arms! They are only a link ("chains") between your heavy hips and the handlebar. |
| High hips | You push your butt back but stay high. | Drop your butt toward the tire! You have to stay low to shift your center of mass. |
| Bailing out with the brake | You constantly brake so you don't fall backward. | Trust your hips. Learn to regain balance by moving your body forward; the brake is for emergencies only. |
Sports Science: Proprioception
This skill is an extreme test of your proprioception (awareness of your body position) and core strength. The focus is on the Erector spinae and Gluteus Maximus.
Nutrition for the CNS:Balance techniques require B vitamins (B6, B12) for neurotransmission. Even mild dehydration ruins fine balance.
Execution checklist:
Pro Tips for Success
It is easier to balance at 25 km/h than at 10 km/h. The gyroscopic effect of the rear wheel keeps you stable from side to side.
Crucial. Dropped heels give you the leverage to push the bike forward with your legs, which helps lift the front end.