Protocol: MTB Jumping Technique – The Art of Flying
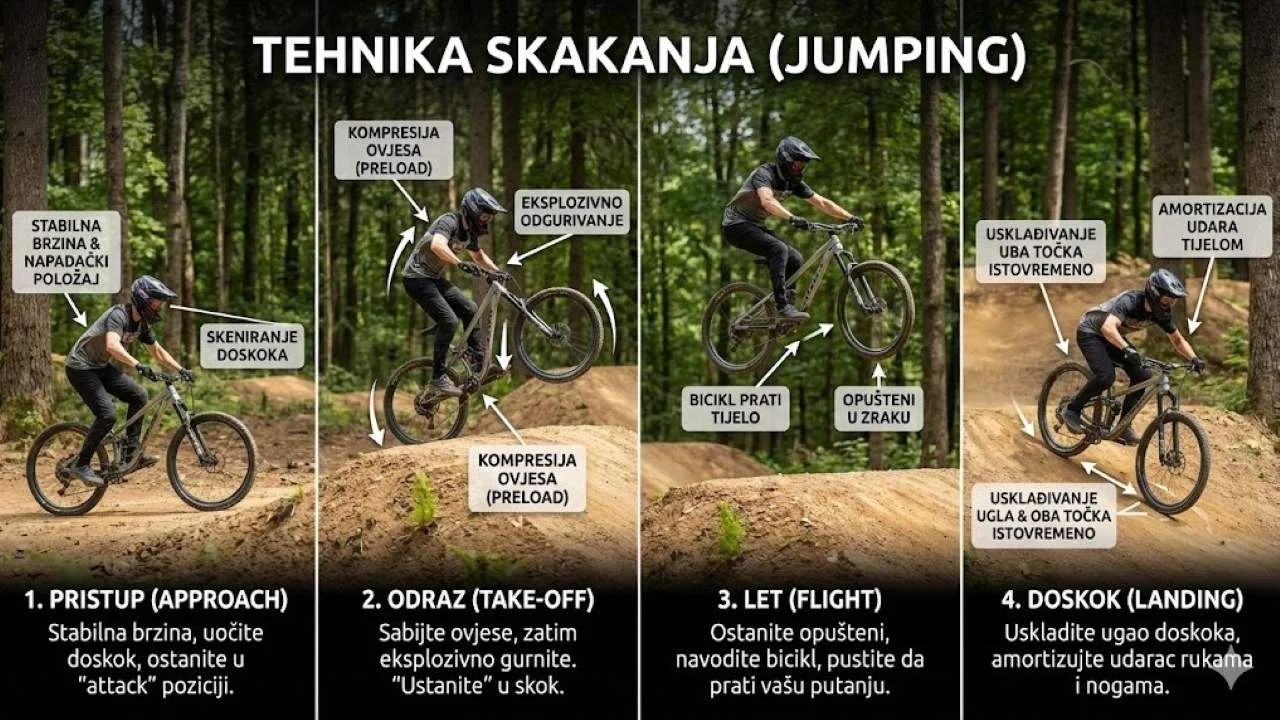
Goal: A safe take-off, a controlled flight path and a precise landing – the foundation of solid MTB jumping technique.
A jump doesn't "happen" to you; you actively perform it. Jumping is nothing more than vertical pumping. Instead of "absorbing" the lip, you "attack" it and push off against it at the very top. If you want to know how to jump a mountain bike with control, this skill is the key to your progress.
Glossary of Key Terms
1. Biomechanics: MTB Jumping Technique in 4 Phases
A jump has 4 phases. Miss one and you're flying out of control. Proper MTB jumping technique demands precision in every phase.
| Phase | Action description | Biomechanical goal |
|---|---|---|
| 1. Approach | Constant speed, brakes released. Eyes on the Lip. | Securing kinetic energy. |
| 2. Pre-load | Strong compression of both wheels into the ramp transition. | Storing energy in the suspension and tyres. |
| 3. Pop (Take-off) | Extend your legs explosively as the rear wheel reaches the Lip. | Converting compression into vertical thrust. |
| 4. Flight & Landing | Level the bike. Look at the landing. | Preparing for a soft contact with the ground. |
Level 2: Tabletop (Safety)
We learn on tabletops. The goal is to hit the transition (the landing slope), not to land on the flat.
Learn to push off with your legs. If you pull the handlebar with your arms without a leg push, you'll end up on your back.
Level 3: Gaps & Scrubs (Pro)
It's a mental game. On a Gap there is no "maybe". Commitment is the key.
Pushing the rear end sideways creates rotational inertia that keeps you stable in the air (like a gyroscope).
3. Training Plan: Jumping Progression
| Drill | Specification | Goal |
|---|---|---|
| Tabletop Focus | Jumping on a tabletop with no gap. | Building confidence in Preload without risk. |
| Boost Drill | Jump as high as possible at low speed. | Maximum explosiveness and full body extension. |
| The Squash | Riding over a jump without leaving the ground. | Developing "Scrub" technique and absorption. |
| Landing Match | Adjusting the bike's angle in the air. | A perfect match with the slope of the landing. |
4. Most Common Mistakes (Troubleshooting)
The rider freezes in the air. Fix: Move! Do anything (wiggle a knee, turn the bars). It breaks the mental block.
The front wheel drops sharply. Fix: Either the rear shock's Rebound is too fast or your body is too far forward at take-off.
The rear wheel kicks you in the backside. Fix: Wrong timing. You compressed the bike at the top of the ramp instead of at the bottom.
5. Fear of Flying: The Psychological Barrier
Many riders master the physical side, but their MTB jumping technique falls apart because of fear. Fear causes stiffness ("Dead Sailor"), which is most dangerous in the air.
The key is small steps. Don't attempt big jumps until you're 100% relaxed on small ones. When you're relaxed, the bike becomes an extension of your body. If you're tense, the bike is a projectile you happen to be sitting on.
CNS Focus and Nutrition
Jumping is a stressful event for the CNS and demands top-level proprioception.
- Fueling: 30-60g of carbohydrates per hour. Low blood sugar = bad timing = crash.
- Focus: Caffeine improves depth perception and speed judgement.
Jump Checklist:
Pro Tips for Level 3
If you're heading to the bike park, slow down the rear shock's Rebound by 2-3 clicks. This prevents "bucking" on steep take-offs.
The best way to learn the speed for a big Gap is to follow a more experienced rider (5-10m behind) and copy their speed.
In the air you're a sail. If there's a crosswind, lean the bike into the wind while airborne to compensate for drift.