Protocol: MTB Descending Technique and Terrain Control
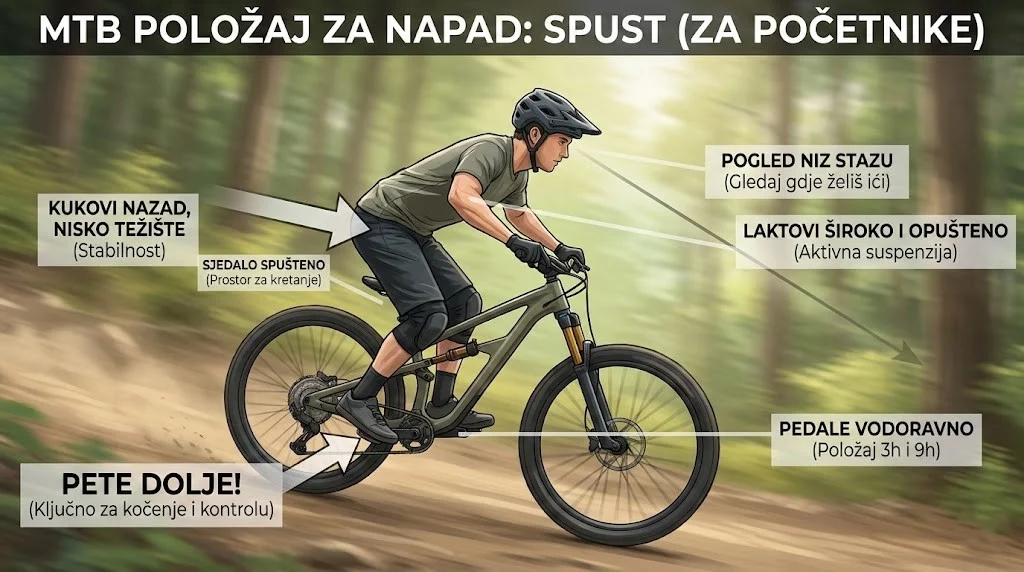
Goal: Build solid MTB descending technique: dynamic stability, safe handling of obstacles (roots, rocks) and more speed on descents without the risk.
This session is not about fitness, it is about skill. Good MTB descending technique teaches you to separate the movement of the bike from the movement of your body (Bike-Body Separation) and to use the terrain to generate speed instead of simply surrendering to gravity.
Glossary of Key Terms
1. Biomechanical Foundation: The Attack Position
Mistake no. 1 among recreational riders is sitting on the descent or standing with locked knees. A proper attack position is the foundation of safe riding and a key element of any advanced MTB descending technique.
2. Technical Training Table (Skills Drills)
Do this session on a short, familiar trail or a meadow so you can sharpen your MTB descending technique in controlled conditions. Don't do it on a long ride. Duration: 45-60 min.
| Drill | Duration / Repetitions | Goal | Focus |
|---|---|---|---|
| Trackstand (Balance in place) | 5 min (10-second attempts) | Static balance | Look ahead, not at the wheel. Brake lightly. |
| Braking to a point | 10 repetitions | Brake modulation | Roll in and stop exactly on the line without locking the wheels. |
| Slalom (Body Separation) | 15 min | Bike lean | The bike goes left-right, the body stays upright. |
| Curb attack | 10 repetitions | Unweighting timing | Press down (preload), then pull up the front wheel to clear the obstacle. |
3. Braking Protocol (Modulation)
- One finger: With hydraulic brakes, brake with the index finger only. The other three fingers hold the grip.
- Timing: Brake BEFORE the obstacle or corner. Inside the corner, release the brakes ("Let it roll").
- Force ratio: 60% front (stopping) and 40% rear (correction). Fear of the front brake is solved by dropping your heels.
4. Visualization and Line Choice
Recreational riders stare at the tree they want to avoid (Target Fixation). For your MTB descending technique to be effective, your vision must stay active.
- Z1 (Immediate): Ignore it. Too late to react.
- Z2 (Middle): This is where you pick your line (5m ahead).
- Z3 (Far): Scan the corner exit.
5. Setting Up Your Bike for Technical Riding
6. Safety and the Mental Side of Descending
Good MTB descending technique is not only a physical skill but also mental discipline. Fear is the biggest enemy because it makes your body stiff ("locking up").
When you are tense, every bump goes straight into your bones. Consciously relax your shoulders and your grip on the bars. Let the bike work underneath you.
Don't try to ride black trails before you have mastered the blue ones. Gradually increasing the difficulty of the terrain builds confidence and muscle memory.
Pro Tips for MTB Descents (Level 2)
Crossing rocks slowly is unstable. The gyroscopic effect of the wheels helps the bike "float" over holes instead of dropping into every one.
If your forearms are "set in concrete", you send every vibration straight to your neck. Loosen your grip. The bike should dance underneath you, which is the essence of good MTB descending technique.
Drop the outside pedal down and press on it with your full weight. This drives the tire knobs into the ground and gives you grip.