Protocol: Front Wheel Lift
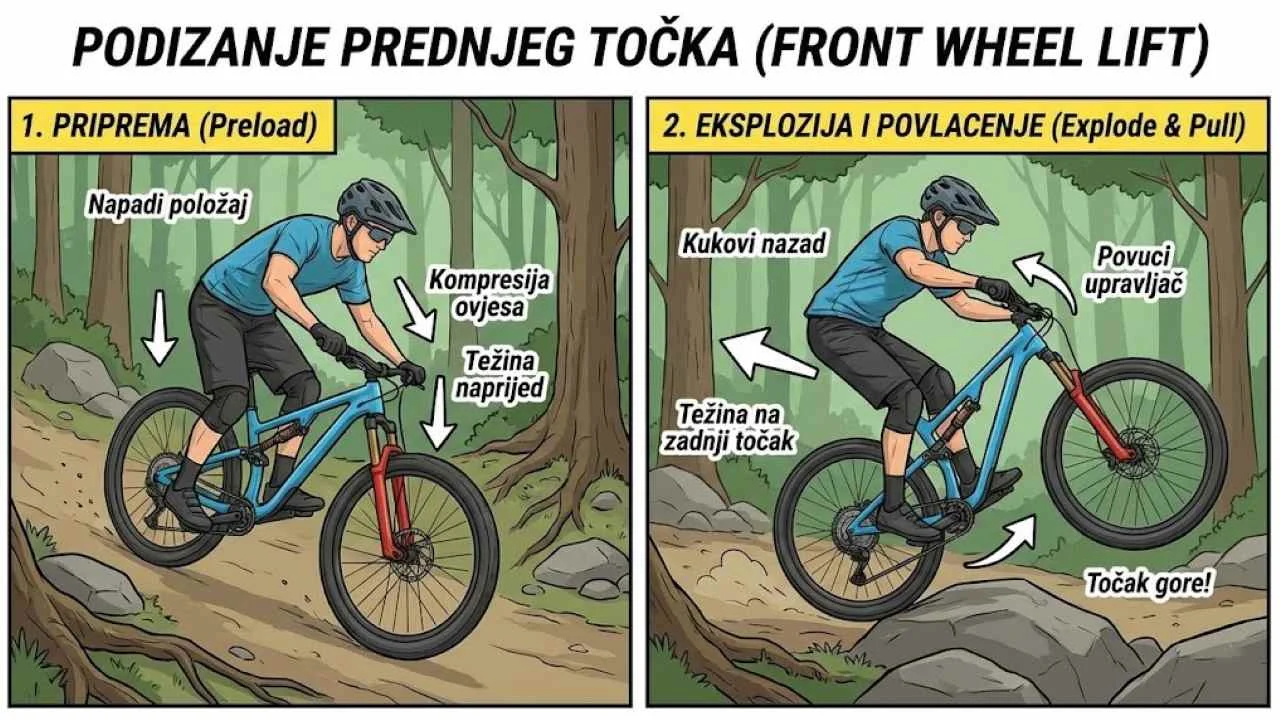
Goal: A safe front wheel lift over obstacles (roots, curbs) without harsh impacts or losing momentum.
The biggest misconception in mountain bike technique is that you lift the front wheel with your arms. That's a mistake. The front wheel lift comes from shifting your center of mass backward (the "Weight Shift"). Your arms are just "hooks" holding the handlebar, while the big muscles of your legs and back do the work.
Glossary of Key Terms
1. Biomechanics: The "Seesaw" Principle
Picture your bike as a seesaw. The wheels are the ends and you're in the middle. If you push your hips back, the front end has to go up.
| Phase | Action | Biomechanical goal |
|---|---|---|
| 1. Compression | From the Attack Position, push the handlebar down briefly and firmly. | Compress the front tire and suspension to create a "rebound" effect. |
| 2. Shift (Explosion) | Throw your hips back sharply (behind the saddle axis). Arms stay extended. | Move your center of mass behind the rear axle. |
| 3. Lift | Let the handlebar rise while your legs extend slightly. | Convert horizontal energy into vertical movement. |
| 4. Reset | As soon as the wheel clears the obstacle, bring your body forward again. | Prepare for the rear wheel to roll over (unweighting the rear end). |
Level 1: Unweighting (Start)
For kids and beginners. The goal isn't a high lift, it's preventing a harsh impact.
Imagine the handlebar is hot and you have to back away from it! Just straighten your arms and push your butt back.
Level 2: Explosiveness (Enthusiast)
Here we introduce the "Pre-load". The goal is to get up a curb or roll over a thick root.
First down (compression), then sharply back (shift). This creates enough energy for the wheel to jump 15+ cm.
3. Training Plan: Front Wheel Lift Drills
| Drill | Level | Goal |
|---|---|---|
| Line Lift (Garden Hose) | Level 1 | Try to "unweight" the front wheel over a garden hose without touching it. Hip work only. |
| The Curb | Level 1/2 | Climb a curb from a standstill or at slow speed. Coordinate compression and takeoff. |
| Timing Drill | Level 2 | Place a branch on the trail; lift the wheel 50 cm before the branch at a speed of 15-20 km/h. |
| Double Lift | Level 2 | Lift the front wheel, then immediately the rear (without jumping). The foundation of the bunny hop. |
4. Common Mistakes and Fixes
The rider bends the elbows and yanks the handlebar toward the chest with biceps power. The wheel barely leaves the ground. Fix: Straighten your arms! The power comes from your hips.
You just lean back without pushing down first. The wheel rises slowly and low. Fix: Push down, then pull back.
Physiology and Nutrition
The front wheel lift is an explosive movement that relies on the ATP-CP system.
- Physiological demand: High motor unit recruitment in the leg muscles (glutes, quadriceps) and lower back.
- Supplementation: Creatine Monohydrate (3-5 g daily) increases energy availability for explosive movements like this.
Front wheel lift checklist:
Pro Tips for Safety
This is not a "Wheelie". Don't turn the pedals. If you pedal, you'll accelerate toward the obstacle, which is dangerous. This move relies on momentum alone.
Always keep one finger on the rear brake. If you pull back too far, squeezing the rear brake instantly brings the front wheel back down.
Use a cardboard box or a plastic bottle for practice. If you miss, the box will get crushed without you falling. Don't practice on a concrete curb until you're ready.