Protocol: Drop-off Technique for Tackling Vertical Obstacles
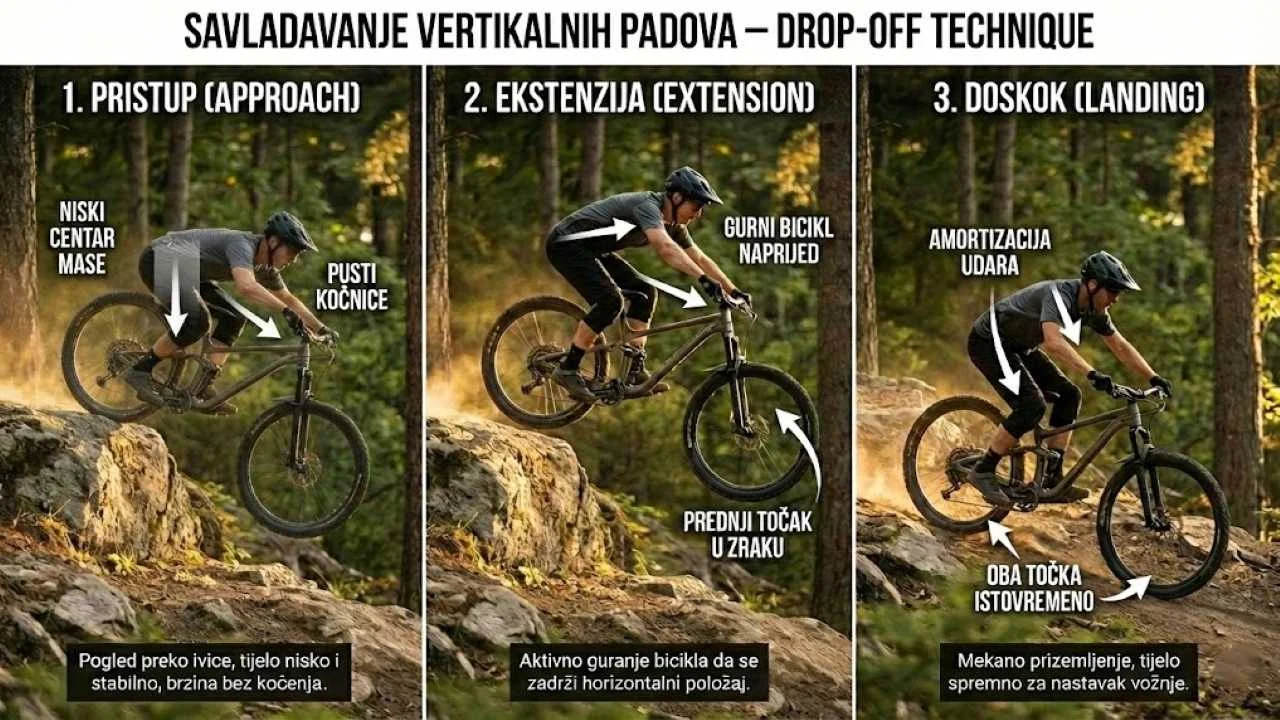
Goal: Use solid drop-off technique to get down a vertical edge (rock, curb) safely, so the bike lands on both wheels at the same time.
If you simply roll off the edge, the front wheel will drop and the rear wheel will catapult you over the handlebars (OTB). Proper drop-off technique comes down to keeping the bike parallel to the ground during flight, which demands precise timing and body control.
Glossary of Key Terms
1. Level 2: The Fast Drop (The Push)
When you have speed (jogging pace or faster), you don't need a Manual. You only need a horizontal push. This is the basic drop-off technique for most trails.
| Phase | Action | Biomechanical goal |
|---|---|---|
| 1. Approach | Low Attack Position. Release the brakes! | Stabilize your body mass. Braking at the edge throws you forward. |
| 2. Scanning | Look at the landing, not the edge. | Focus on the target (Landing). |
| 3. Extension | Push the bike forward with your arms and legs. | "Lengthen" the bike so the front wheel stays in the air until the rear wheel leaves the edge. |
| 4. Landing | Both wheels at the same time. | Absorb the impact with your arms and legs. |
2. Level 3: The Slow Drop (Wheelie Drop)
This one is harder. When you approach slowly (< 10 km/h), you have no momentum. If you just push forward, you'll nosedive. You need to use a Manual to get the right drop-off technique at low speeds.
Explosively throw your hips back (L-move) when the front wheel is 20cm before the edge. The wheel must come up before it leaves the edge.
If you're too slow, give a strong "half-stroke" on the pedals to lift the front end.
3. Table: Landing Analysis (Landing Gear)
How do you land without wrecking your wheels or joints? Your drop-off technique has to include planning the landing too.
| Landing Type | Landing Technique | Why? |
|---|---|---|
| Flat | Rear wheel first (gently) | Landing on both wheels at once on flat ground is a big shock for your joints. The rear wheel and legs absorb the energy first. |
| Slope (Downhill) | Both wheels at the same time | The goal is to match the slope of the terrain. If you land on the front wheel, you go over the bars. |
| Rough (Rocky) | Light and soft | Stay as relaxed as possible. Don't brake the moment you hit the ground! |
4. The Most Common Drop Mistakes
Squeezing the brake right at the edge. The front wheel stops and the rider flies over. This is the clearest sign of poor drop-off technique. Fix: Brake BEFORE, release AT the edge.
The rider freezes in the air and lands sideways or hard. Fix: Stay active. Breathe. Look at the landing. Move the bike in the air.
5. Training Plan: Drop Progression
- 1. Curb Drop: Ride off a curb at low speed. Focus on the timing of pushing your arms forward.
- 2. Slow-Speed Drop: A 30-50 cm drop at walking speed. Exaggerate the hip movement backward.
- 3. Blind Landing: A drop where you can't see the landing from the edge. Visual scanning and trust in your technique.
Impact Physiology
Landing creates huge forces that are absorbed through eccentric contraction of the muscles.
Nutrition for your joints:Taking collagen with vitamin C may help preserve the connective tissue (tendons and ligaments) that takes the stress.
Drop Checklist:
Pro Tip: Speed Check
If you stop pedaling 5 meters before the drop, will you still reach the edge quickly?
If the answer is YES -> Level 2 (Push forward).
If the answer is NO -> Level 3 (Manual/Pull).