Protocol: Berm Riding Through Banked Corners
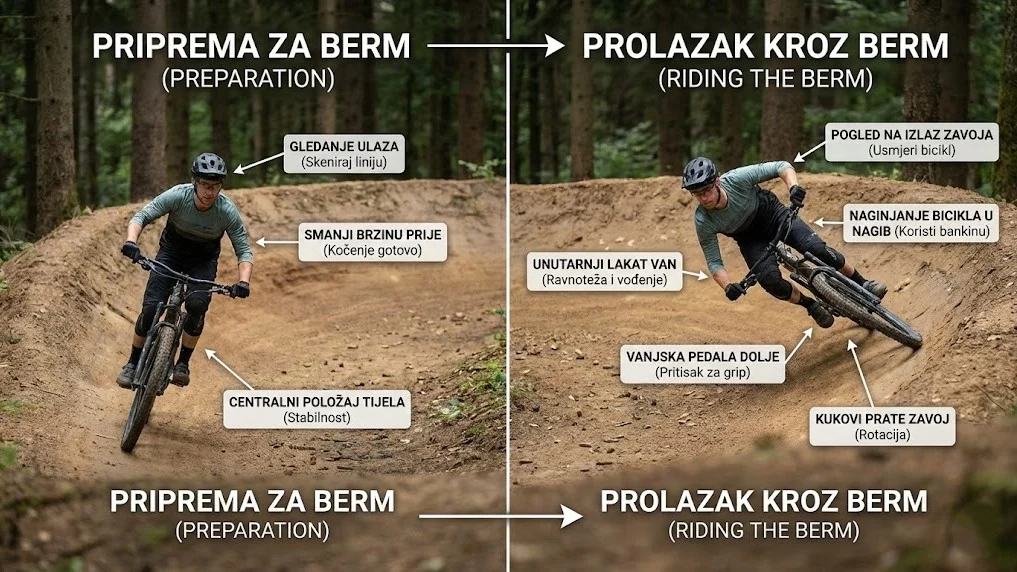
Goal: Master berm riding by using the slope of the terrain to neutralize lateral forces, preserve momentum and generate brutal exit speed.
A berm is an engineered friend of the rider. Good MTB cornering technique in banked corners lets you counter centrifugal force. Instead of fighting for traction, you fight the G-force that "squeezes" you into the turn.
Glossary of Technical Terms
1. The Physics of Berm Riding: Why Are We Faster?
In a flat corner, traction depends purely on friction. When you start berm riding, the surface sits perpendicular to the resultant force, which drastically increases grip.
Imagine a laser shooting out of your saddle. That laser should hit the surface of the berm at a 90-degree angle, not point along gravity.
Lean into the corner! Trust the physics. Centrifugal force keeps you stuck to the surface. If you stay upright, that force will throw you over the top edge of the berm (high-side).
2. Biomechanics: The Phases of a Berm
Unlike flat corners (where we use bike-body separation), efficient berm riding often requires your body and bike to lean together.
| Phase | Action description | Biomechanical goal |
|---|---|---|
| 1. Entry | High line. Braking finished. Eyes on the entry. | Make the most of the radius. Prepare for the G-force. |
| 2. Lean | Lean the bike and body parallel to the slope. Elbows wide. | Get perpendicular to the surface for maximum grip. |
| 3. Compression (Apex) | At the deepest point, push the bike hard into the ground with your legs (pump). | Use centrifugal force to generate acceleration. |
| 4. Exit | Look at the exit point ("light at the end of the tunnel"). | Convert the pressure from the berm into linear speed. |
3. Visual Technique in the Berm
Because of the higher speed, your visual scanning has to be faster. A berm is like a tunnel – look at the exit.
- Entry: Look at your entry line (usually the outer, high side).
- Middle: As soon as the wheel touches the berm, your eyes must instantly switch to the exit.
- Mistake: Staring at the front wheel in the middle of the berm causes disorientation and a loss of speed.
4. Most Common Mistakes (Troubleshooting)
- Low Entry: Entering at the bottom of the berm shortens your radius and forces you to brake hard. Always enter high.
- Braking in the berm: Pulling the brakes while leaned over stands the bike up and throws you over the top.
- Passivity: If you don't push the bike into the berm, the berm will "eat" your speed. You have to be active.
5. Training Plan: Drills for Better Berm Riding
| Exercise | Repetitions | Goal |
|---|---|---|
| High-to-Low | 10 runs | Enter high, exit low. Convert potential energy into speed. |
| One-Handed Entry | 5 runs | Enter a gentle berm using only your outside hand. Build trust in centrifugal force. |
| Berm Pump | 10 runs | Focus only on a strong leg push in the center. Feel the "slingshot" out of the corner. |
Nutrition and Recovery
Intense berm riding at high speeds puts heavy G-loads on your leg and core muscles.
- Intra-workout: Electrolytes, especially magnesium (150-200mg), to prevent cramps.
- Recovery: Protein and carbs within 30 min (glycogen window) to repair muscle fibers damaged by eccentric loading.
Checklist for the Perfect Berm:
Pro Tips for Level 3
Even though the pedals can be level (3 and 9 o'clock), many pro riders still drop the outside foot for stronger pressure and stability against the G-force.
In racing, we sometimes don't ride the whole berm. We carry in hard, snap the bike sharply at the apex (pivot), and shoot out in a straight line to shorten the path.