When it comes to bike component wear, regular checks are the simplest way to keep your bike safe, reliable and fun to ride on the trail. Some parts show obvious signs of wear, while others can only be measured accurately with the right tool. You can do many of the basic checks yourself, without a trip to a professional bike service.
In this guide from our Small Workshop, the MTB Evolution team explains the easiest way to check the condition of the key parts on your bike.
In short: bike component wear
- Chain and cassette: A chain checker is the only tool that gives you an accurate reading. Replace the chain at 0.5% (11/12-speed) or 0.75% (8/9/10-speed).
- Brakes and rotors: The minimum pad thickness is 1 mm. Replace rotors when a stepped edge forms or they reach their minimum rated thickness.
- E-bike specifics: The drivetrain on e-bikes can wear up to three times faster because of the motor's high torque.
- M-Check: A 10-minute home check (tires, brakes, bearings, bolts) before every ride is the key to safety.
1. How to Check Chain Wear
The chain is by far the fastest-wearing component, especially on the mountain bikes and e-bikes we ride in the Bike Park. With use, the pins and rollers inside the links wear down, which makes the chain longer (often wrongly called "stretching of the material").
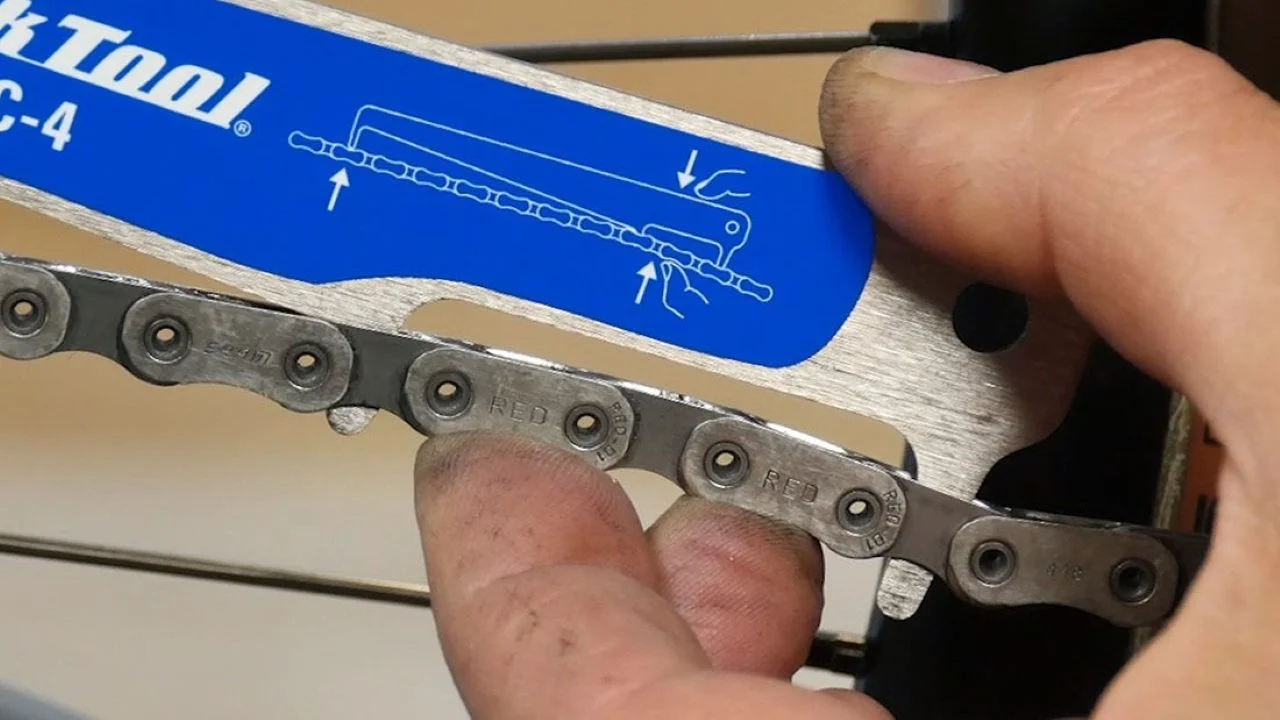
The most accurate method – a chain checker: The checker sits between the links and shows the wear percentage:
- 0.5% – Time to replace on 11-speed and 12-speed systems.
- 0.75% – The chain is badly worn and should be replaced on 8, 9 and 10-speed systems.
- 1.0% and above – The chain is critically worn. It has almost certainly damaged the cassette and chainrings permanently.

2. How to Check Cassette Wear
A worn cassette is most often the result of riding too long on a worn chain. Our advice at Cycling Club East Sarajevo is not to replace the cassette automatically with every chain. Assess its condition first by eye, then with a practical test. For a deeper look at when to swap both parts, see our guide to drivetrain wear.
- A new chain skips on the old cassette under heavier load (the most obvious sign).
- The teeth on the most-used cogs look very pointed, deformed or have friction "burrs".
- The chain "grabs" the cogs unevenly.
3. How to Check Your Chainrings
Front chainrings wear more slowly than the cassette, but they still need regular visual checks. A new chainring has symmetrical teeth. If the teeth become thin, hooked or start to look like shark fins, the chainring is ready to be replaced. Riding on a worn chainring causes chain drop ("chainsuck") and speeds up wear across the whole system.
4. Tire Condition and Tubeless Setups
Tires are your only contact with the ground. Don't wait for a puncture on the trail to inspect them.
- Tread: Watch the height of the center and side knobs. On road tires, look at the wear indicators (small holes).
- Sidewalls: Look for deep cracks, bulges, damaged casing fibers and signs of rubber rot from age.
- Tubeless setups: Check the seal against the rim. Top up the sealant every 3 to 6 months, because dried-out sealant offers no protection. If you're new to it, our tubeless setup guide walks you through it.
5. Brake Pad and Rotor Wear
Safety on the bike starts with the brakes. Visually check the thickness of the friction material (the part that presses on the rotor, not the metal backing plate).
- Thickness rule: If the friction material is thinner than 1 mm, the pads must be replaced right away. Our brake pad calculator and guide can help you choose the right set.
- Contamination: If the brakes squeal loudly and brake poorly, the pads have probably soaked up oil or degreaser. They must be replaced regardless of thickness.
As for brake rotors, they get thinner with every stop. The minimum allowed thickness is often laser-etched on the rotor (usually 1.5 mm for Shimano or 1.55 mm for SRAM). Look for deep grooves, a "stepped" edge, strong purple discoloration (overheating) or serious warping.
6. Checking Bearings (Wheels, Drivetrain, Headset)
All bearings on a bike are tested on the same principle: look for no side-to-side play and completely smooth rotation without any grinding.
- Wheels: Lift the wheel and spin it. Try to move it left and right. There must be no rocking.
- Drivetrain (Bottom Bracket): Remove the chain and spin the cranks. They should turn without resistance. Creaking under load often points to a dry bearing.
- Steering bearing (Headset): Squeeze the front brake and rock the bike forward and back. If you feel knocking in the head tube, the headset is loose.
7. E-Bike Specifics and Wear
Checking the chain more often (with a checker) is critical to avoid costly replacement of the whole e-bike drivetrain. If you ride an e-bike, let the chain checker become your best friend in the workshop. For motor and system diagnostics, see our Bosch e-bike service.
Quick Home Check (M-Check) for Bike Component Wear
Before every serious ride, we recommend running through this routine:
- Tires: Correct pressure, no cuts.
- Brakes: Feel at the lever (it doesn't pull to the bars), pad thickness.
- Chain: Clean, lubricated, checked with a chain checker.
- Wheels and bearings: No side play, wheels spin true.
- Bolts: Check the tightness of the wheel axles, stem and cranks.
When Is It Time for a Professional Service?
Reacting to bike component wear in time is always cheaper than repairing the chain damage it causes (for example, replacing a chain on time costs less than replacing the chain, cassette and chainrings together). If you don't have the tools or you're not sure, book an inspection with us.
Book a Bike ServiceHow Often to Check Bike Component Wear
Parts don't wear at the same pace for every rider. Mud, rain, rider weight and riding style can double the rate. So treat these as rough intervals, not hard rules.
- Chain: measure it with a checker often, because it's cheap and protects the cassette and chainrings from fast wear.
- Brake pads: look at them before every longer ride, especially before a descent or a multi-day trip.
- Tires: inspect the tread and sidewalls after every ride over rocks, and check the pressure before every ride.
- Bearings: check the play in the wheels, drivetrain and headset a few times a year.
- Cables and housing: if the shifting is late or the lever returns slowly, it's time to replace them.
Why the Chain Matters Most
A stretched chain wears out the cassette and chainrings, so one skipped check can cost you the whole drivetrain. Replacing the chain on time is several times cheaper than replacing the chain, cassette and chainrings together. That's why a chain checker is the first tool I recommend to every rider.
Signs It's Time for a Service
Chain skipping under load, brake squeal that won't go away, late shifting and unusual noises from the drivetrain or wheels all call for an inspection. Don't wait for the problem to grow, because wear often progresses unnoticed. If you're not sure, bring your bike to the bike service, or book an appointment online.
Sources and Further Reading
- Bicycle chain (Wikipedia) – chain construction and wear
- Disc brake (Wikipedia) – how disc brakes and pads work